
ユーザ管理アップリケ―ションを作りましょう。
いわゆるログイン処理です。
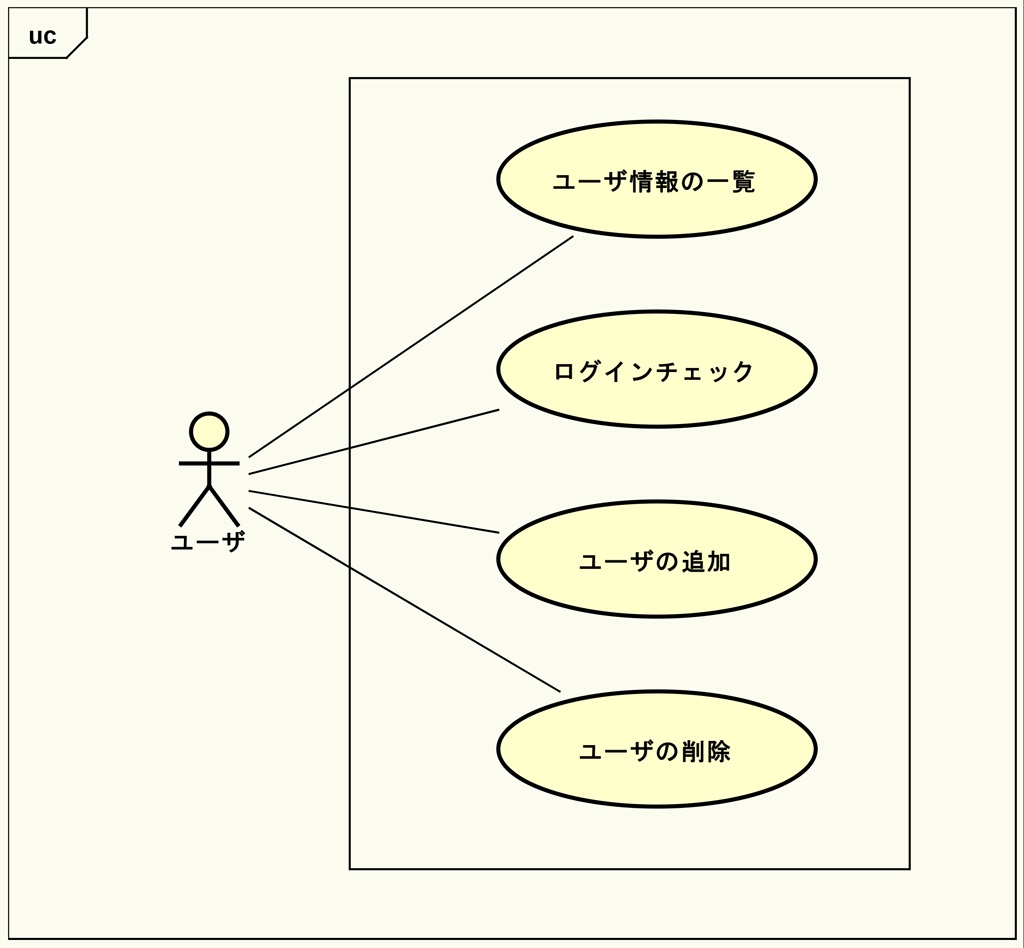
ログイン処理といってもログインチェックを行うためにはユーザの追加やユーザの削除、さらにユーザ情報の一覧が必要でしょう。これらのユースケースを整理したものが左のユースケース図です。
(画像をクリックすると拡大画像が表示されます。)
ログイン処理といってもログインチェックを行うためにはユーザの追加やユーザの削除、さらにユーザ情報の一覧が必要でしょう。これらのユースケースを整理したものが左のユースケース図です。
(画像をクリックすると拡大画像が表示されます。)
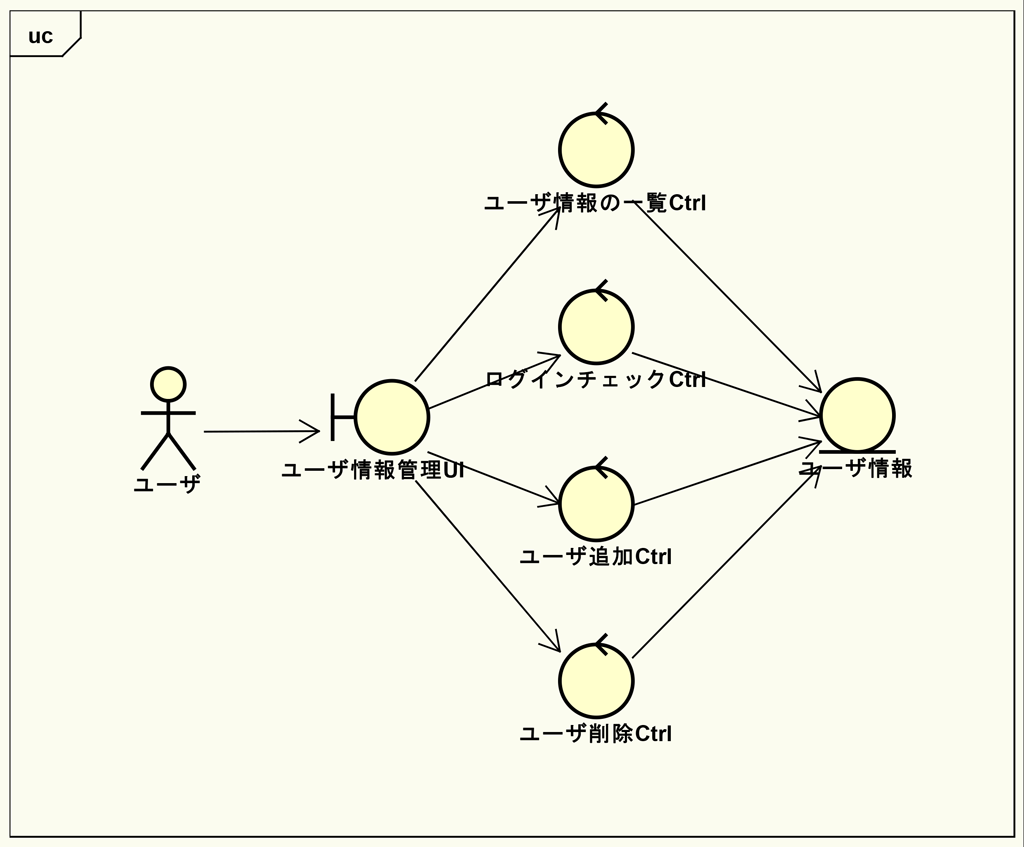
これらのユースケースを実現するためにはユーザ情報管理のUIがユーザとのインターフェースをとり、そこから各処理のコントロールを呼んで、各コントロールが何らかのデータ永続化機構に保存されたユーザ情報エンティティ―にアクセスすることになります。
これら関係するだろうクラスを整理したのが左の実現モデルのクラス図です。
これら関係するだろうクラスを整理したのが左の実現モデルのクラス図です。
さて、データを保存するデータ永続化機構としてはファイルやデータベースが考えられます。ユーザ情報の管理ではユーザのログインチェックの応答性が重要であり、ユーザの追加や削除も度々行われることが想定されます。ファイルは大量情報の保存にはむきますがレコード内情報の検索はできませんし、レコードの削除は基本的にはできません。そこで、ここではデータ永続化機構としてデータベースを使うことにします。
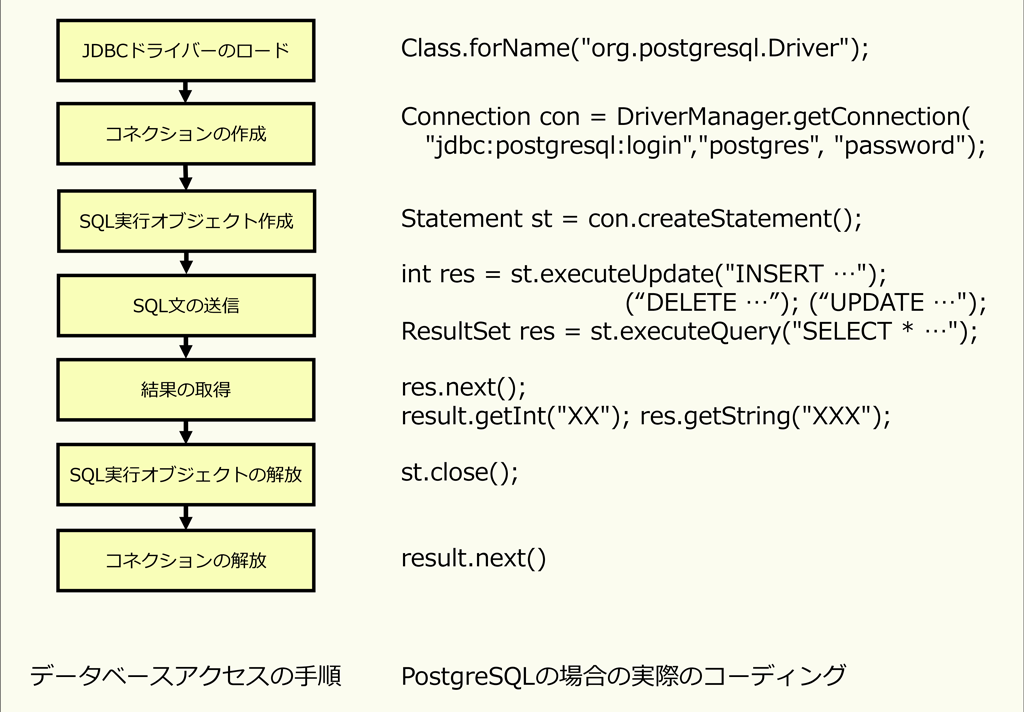
一般的にデータベースはSQL:Structured Query Language(構造化された問合せ言語)という言語を使ってデータベースに対する必要な操作を記述します。そして、SQL文の発行には左のような一連の処理手順が必要です。今回はPostgreSQLというデータベースを使います。基本的なSQLの仕様は多くのデータベースで共通ですが、詳細な点についてはデータベースごとに違いがあるので、詳細は個別に確認してください。
今回はデータベースを使う手順に重点を置いてプログラム開発することとして、プログラムの保守性や拡張性については次の段階で考慮することにします。
そこで、ユーザ情報管理UIはHTMLの出力が容易なJSPで作ることにし、ユーザ情報管理UIからサーブレットで作る各処理を呼び、各処理が完了したらユーザ情報管理UIに戻る構成とします。
各処理の内部はデータベースを扱う手順を確認しやすいように順に手順を書き下します。
そこで、ユーザ情報管理UIはHTMLの出力が容易なJSPで作ることにし、ユーザ情報管理UIからサーブレットで作る各処理を呼び、各処理が完了したらユーザ情報管理UIに戻る構成とします。
各処理の内部はデータベースを扱う手順を確認しやすいように順に手順を書き下します。
実現モデルを時系列で詳細化したのが下のシーケンス図です。
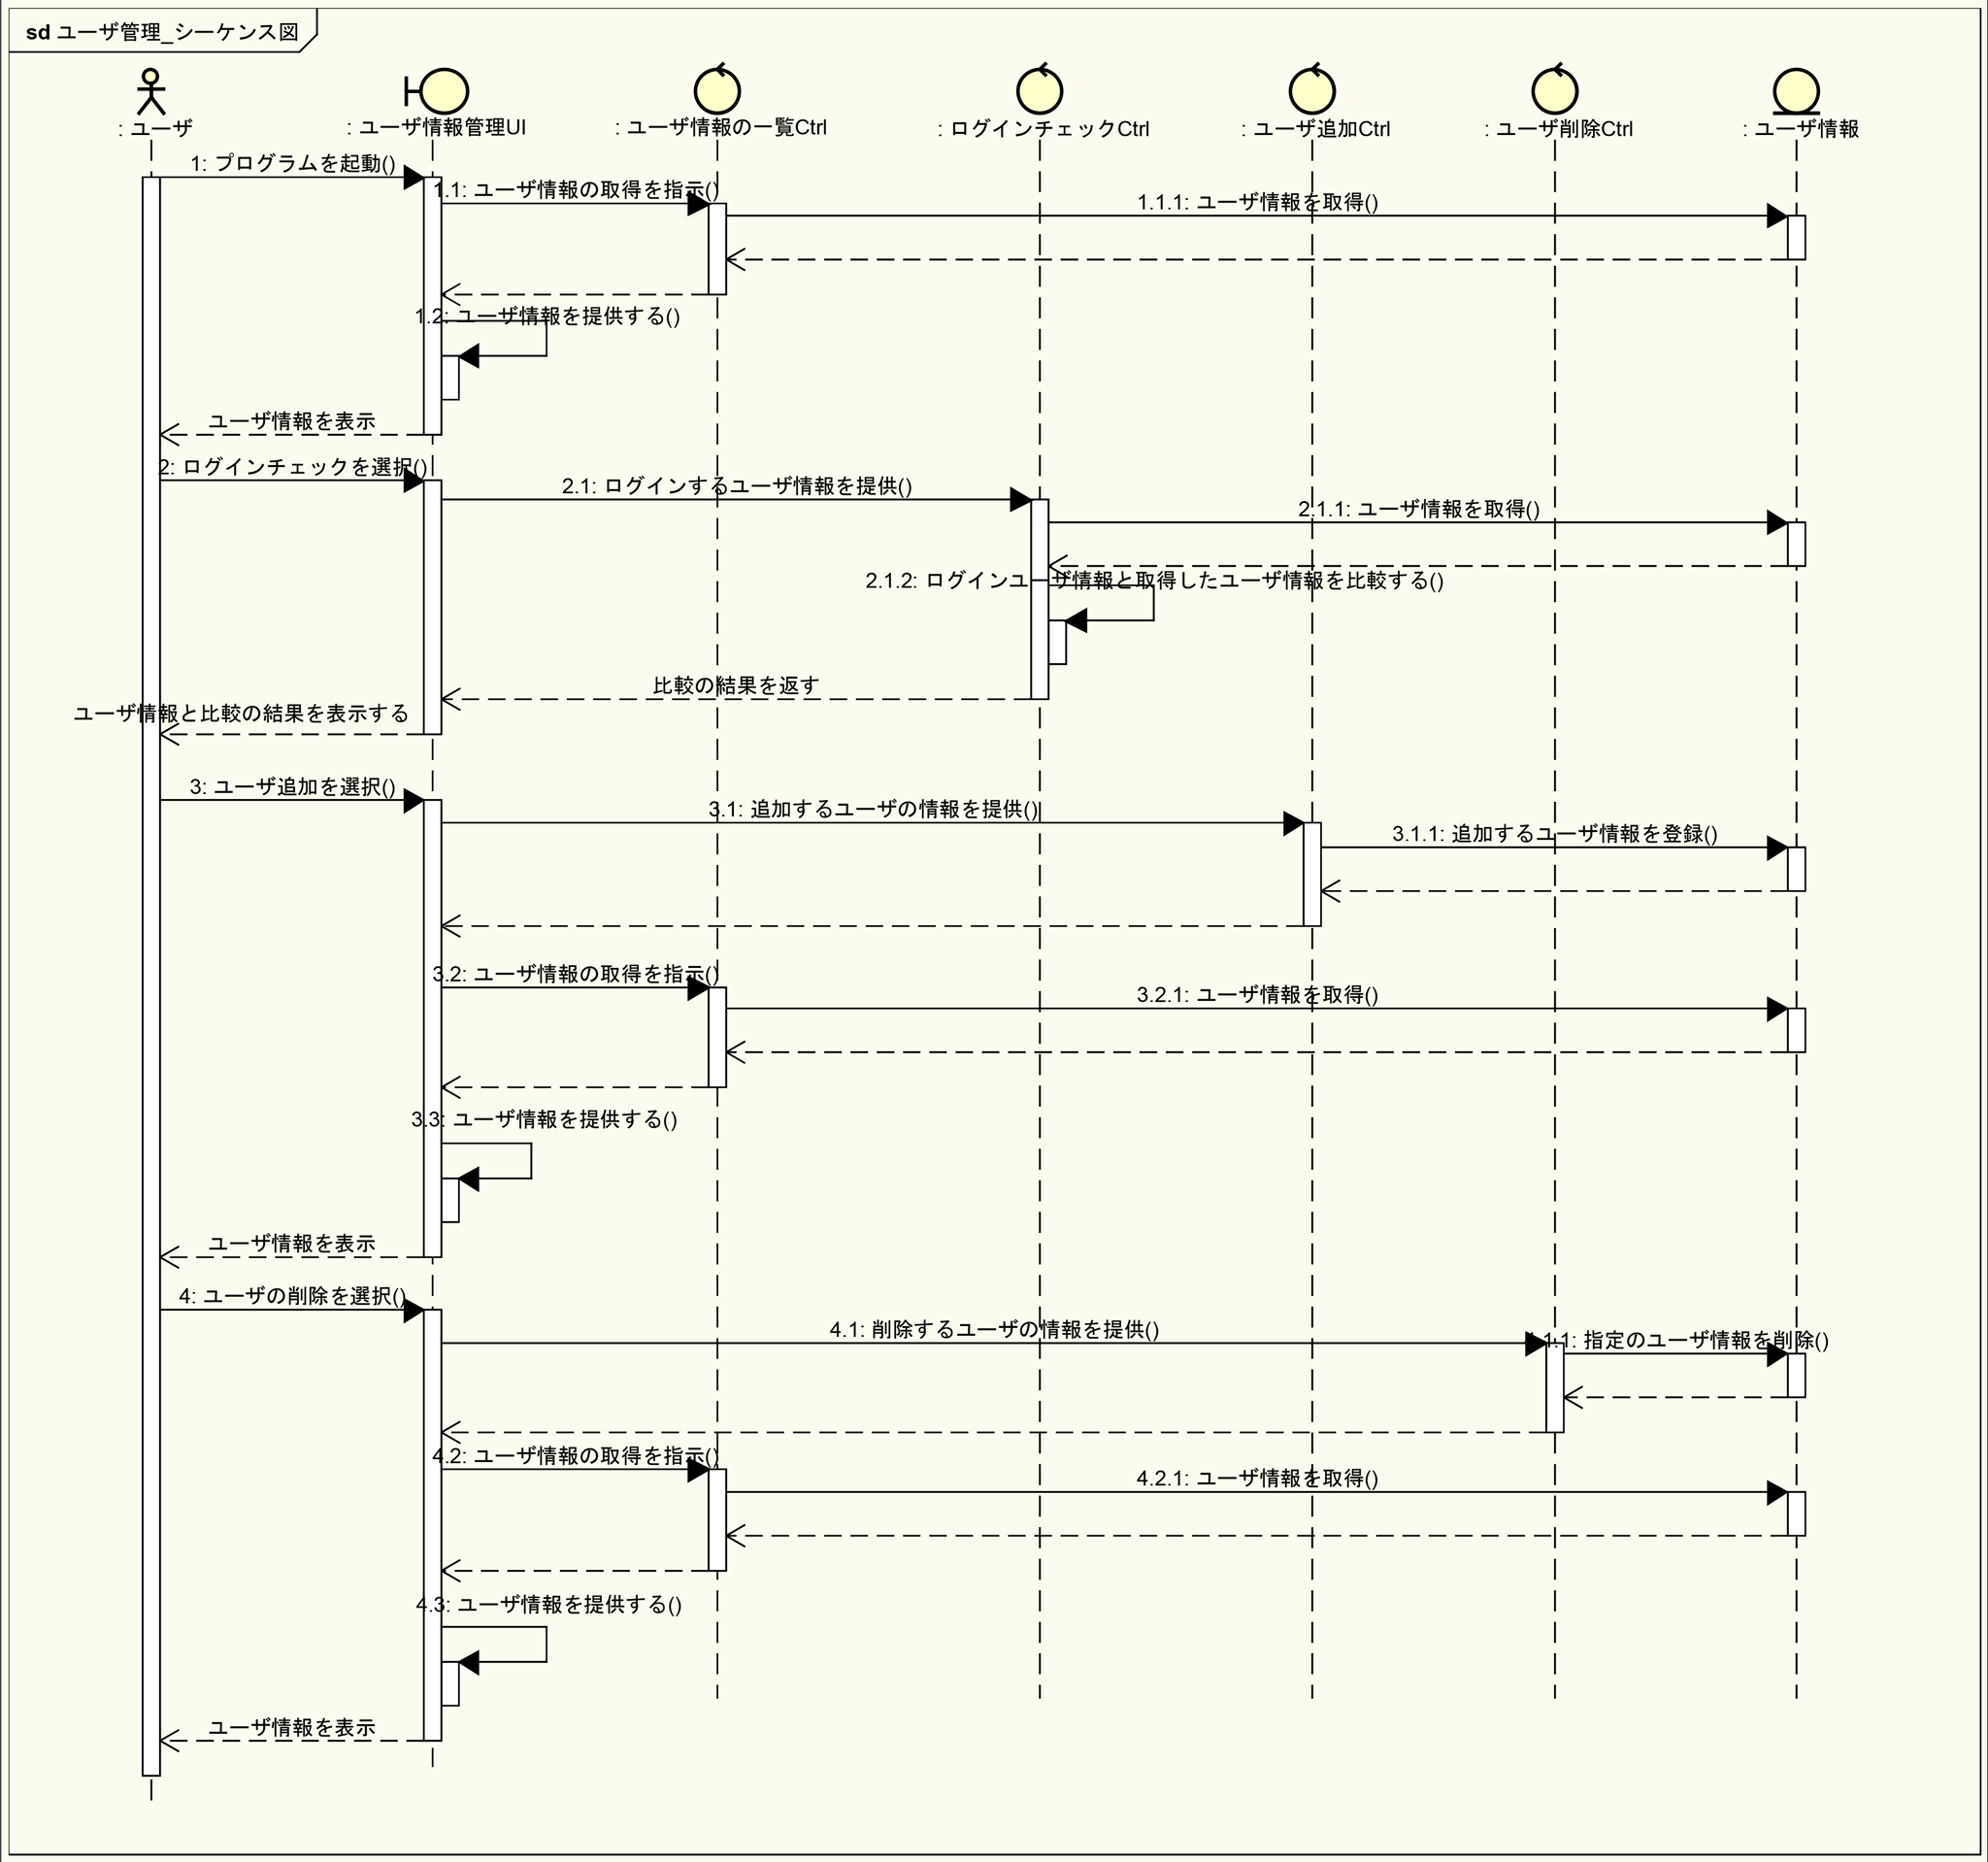

なお、ログインチェック処理ではログイン結果をURLパラメータでユーザ情報管理UIに戻し、ログイン成功/失敗のメッセージを出すので、URLパラメータの操作法についても参考になるでしょう。
では、まず一連の操作を見てみましょう。
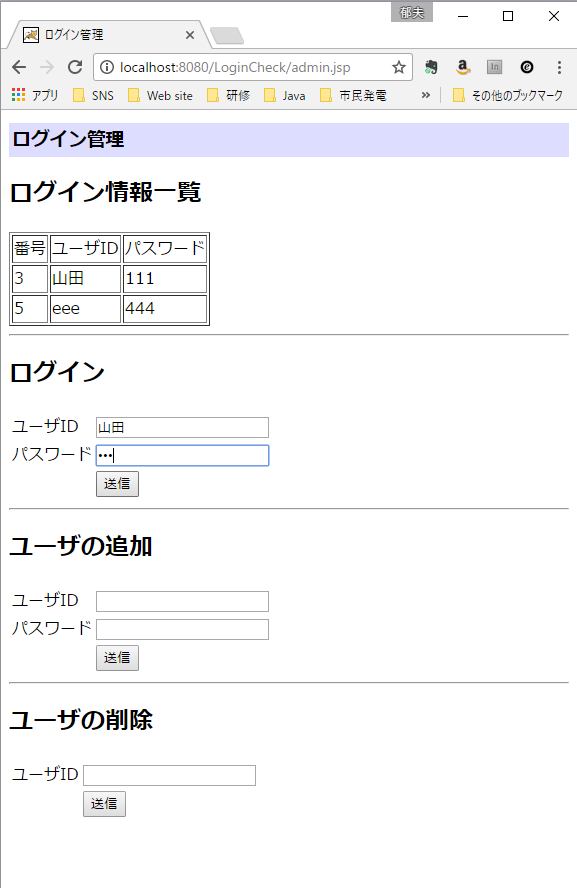
1. 初期画面
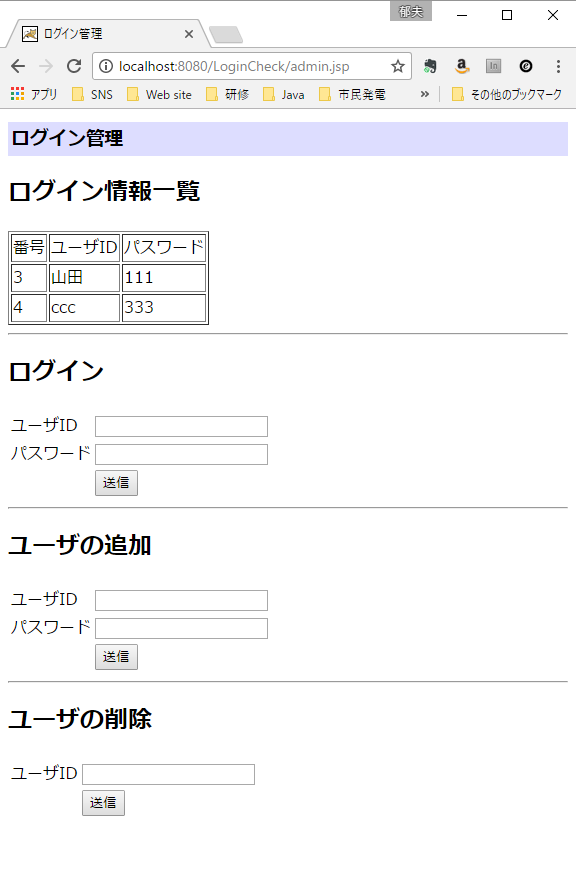

現在DataBaseに登録されているユーザ情報が表示されています。
2. ユーザ情報を入力
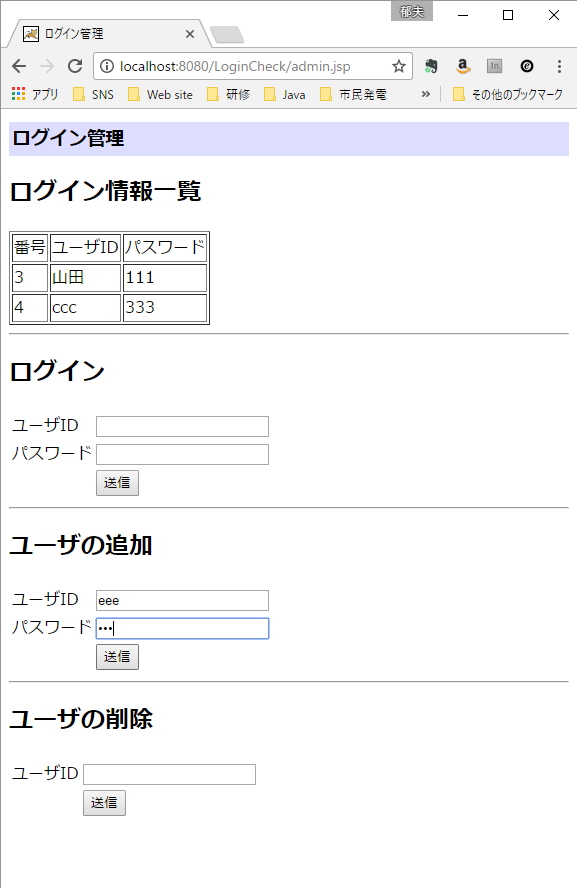

ユーザ名とパスワードを入力します。
3. ユーザ情報を登録
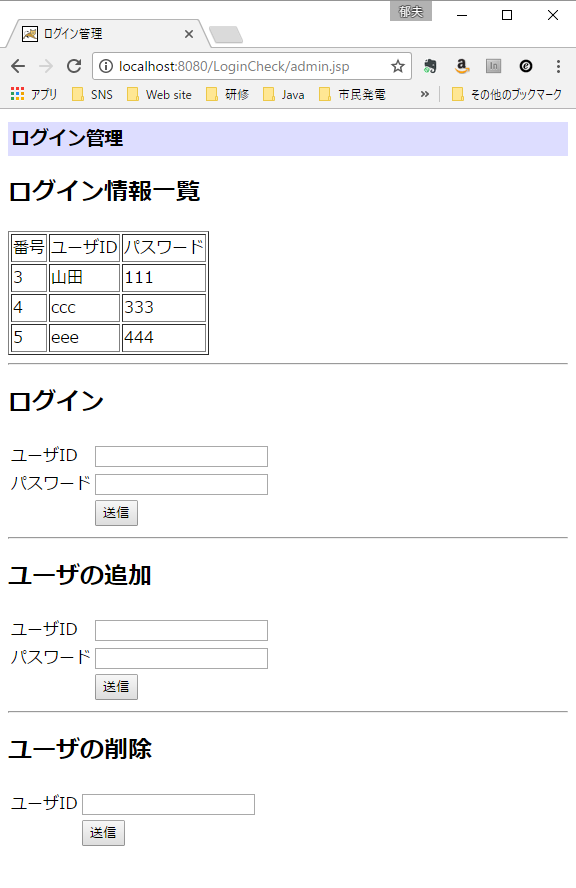

ユーザID=eeeが登録されました。
4. ユーザ情報の削除
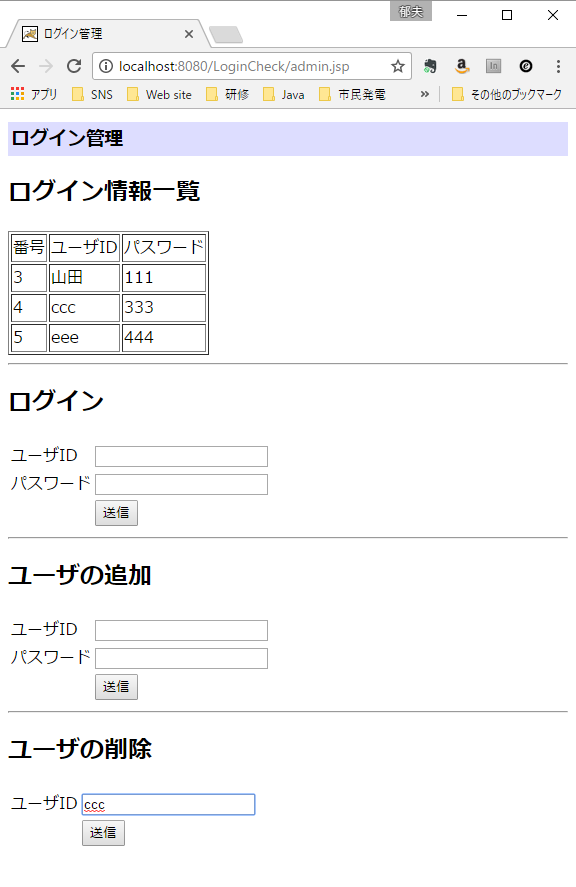

ユーザID=cccを削除します。
5. ユーザ情報の更新


ユーザID=cccが削除されました。
6. ユーザのログイン1回目

ユーザ登録されている山田でログインします。
7. ログイン成功
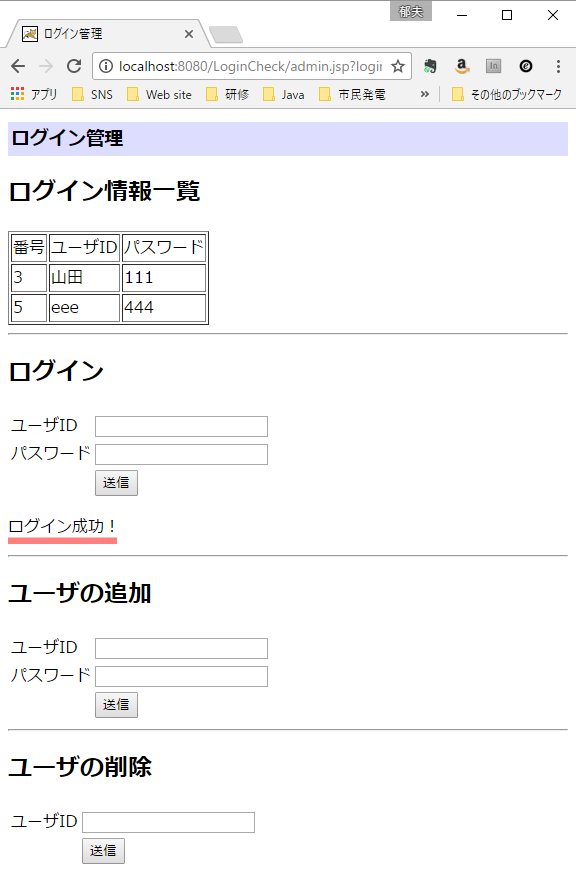

山田のログインは成功しました。
8. ユーザのログイン2回目
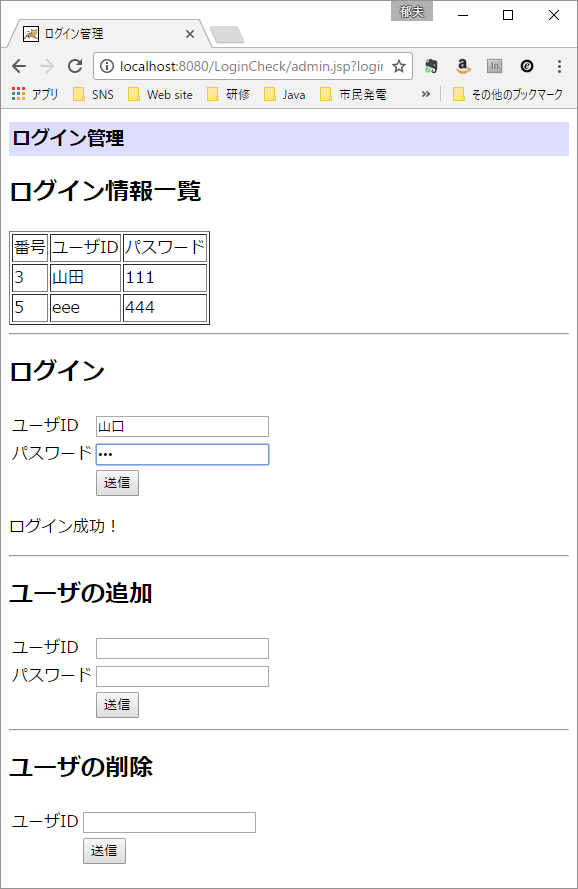

ユーザ登録されていない山口でログインします。
9. ログイン失敗


山口のログインは失敗しました。
次に各処理のソースコードを見てみましょう。
以下、ソースコード内のハイライト部分はJSP又はサーブレットにおけるデータベースに対するアクセス処理です。
まず、ユーザ情報管理UIとユーザ情報の一覧Ctrlを一つで行っているadmin.JSPです。
<%@ page language="java" contentType="text/html; charset=UTF-8"
    pageEncoding="UTF-8"%>
<%@ page import="java.sql.*" %>

<%
	String loginStatus = request.getParameter("login");
	Connection con = null;
	Statement st = null;

	Class.forName("org.postgresql.Driver");
	con = DriverManager.getConnection(
		"jdbc:postgresql:login","postgres", "root");

    st = con.createStatement();
    ResultSet result = st.executeQuery("SELECT * from userinf");

    String html = "<table border=\"1\">";
    html +="<tr><td>番号</td><td>ユーザID</td><td>パスワード</td></tr>";
    while(result.next()) {
    	int no = result.getInt("no");
    	String userID = result.getString("userid");
    	String password = result.getString("password");

    	html += "<tr><td>" + no + "</td><td>" + userID + "</td><td>" + password + "</td></tr>";
    }
    html += "</table>";
    result.close();
    st.close();
    con.close();
%>
<!DOCTYPE html>
<html>
<head>
<meta http-equiv="Content-Type" content="text/html; charset=UTF-8">
<title>ログイン管理</title>
<style>
h1 {font-size: 14pt;
	font-weigh:bold;
	background-color:#DDF;
	padding:3px;}
</style>
</head>
<body>
	<h1>ログイン管理</h1>
	<h2>ログイン情報一覧</h2>
<%=html %>
	<hr>
	<h2>ログイン</h2>
	<form action="./LoginCheck" method="POST">
	<table>
		<tr><td>ユーザID</td><td><input type="text" name="userid"></td></tr>
		<tr><td>パスワード</td><td><input type="password" name="password"></td></tr>
		<tr><td></td><td><input type="submit" value="送信"></td></tr>
	</table></form>
<%
	if(loginStatus != null) {
		if(loginStatus.equals("yes")) {	%>
	<p>ログイン成功!</p>
<%		} else 	{ %>
	<p>ログイン失敗!</p>
<%		}
	} %>
	<hr>
	<h2>ユーザの追加</h2>
	<form action="./AddUser" method="POST">
	<table>
		<tr><td>ユーザID</td><td><input type="text" name="userid"></td></tr>
		<tr><td>パスワード</td><td><input type="password" name="password"></td></tr>
		<tr><td></td><td><input type="submit" value="送信"></td></tr>
	</table></form>
	<hr>
	<h2>ユーザの削除</h2>
	<form action="./DelUser" method="POST">
	<table>
		<tr><td>ユーザID</td><td><input type="text" name="userid"></td></tr>
		<tr><td></td><td><input type="submit" value="送信"></td></tr>
	</table></form>
</body>
</html>
次はログインチェック処理を行うLoginCheck.javaサーブレットです。
package com.example;

import java.io.IOException;
import java.sql.Connection;
import java.sql.DriverManager;
import java.sql.ResultSet;
import java.sql.SQLException;
import java.sql.Statement;

import javax.servlet.ServletException;
import javax.servlet.annotation.WebServlet;
import javax.servlet.http.HttpServlet;
import javax.servlet.http.HttpServletRequest;
import javax.servlet.http.HttpServletResponse;

/**
 * Servlet implementation class AddUser
 */
@WebServlet("/LoginCheck")
public class LoginCheck extends HttpServlet {
	private static final long serialVersionUID = 1L;

    /**
     * @see HttpServlet#HttpServlet()
     */
    public LoginCheck() {
        super();
    }

	/**
	 * @see HttpServlet#doGet(HttpServletRequest request, HttpServletResponse response)
	 */
	protected void doGet(HttpServletRequest request, HttpServletResponse response)
			throws ServletException, IOException {
	}

	/**
	 * @see HttpServlet#doPost(HttpServletRequest request, HttpServletResponse response)
	 */
	protected void doPost(HttpServletRequest request, HttpServletResponse response)
			throws ServletException, IOException {
		request.setCharacterEncoding("UTF-8");

		Connection con = null;
		Statement st = null;
		String userID = request.getParameter("userid");
    	String password = request.getParameter("password");
    	String loginResult = "";

    	try {
    		Class.forName("org.postgresql.Driver");
    		con = DriverManager.getConnection(
    			"jdbc:postgresql:login","postgres", "root");
    		st = con.createStatement();
        	boolean login = false;
    		try {
    			ResultSet result  = st.executeQuery("SELECT * from userinf");
    			while(result.next()) {
    				if(userID.equals(result.getString("userid"))) {
    					if(password.equals(result.getString("password"))) {
    						login = true;
    						break;
    					}
    				}
    			}
    			if(login) {
    				System.out.println("ログイン成功!");
    				loginResult = "?login=yes";
    			} else {
    				System.out.println("ログイン失敗!");
    				loginResult = "?login=no";
    			}
    		} catch (Exception ex) {
    			ex.printStackTrace();
    		}
    		result.close();
    		st.close();
    		con.close();
    	} catch (ClassNotFoundException e) {
    		e.printStackTrace();
    	}catch (SQLException e) {
    		e.printStackTrace();
    	}
    	response.sendRedirect("admin.jsp" + loginResult);
	}
}
次はユーザの追加処理を行うAddUser.javaサーブレットです。
package com.example;

import java.io.IOException;
import java.sql.Connection;
import java.sql.DriverManager;
import java.sql.SQLException;
import java.sql.Statement;

import javax.servlet.ServletException;
import javax.servlet.annotation.WebServlet;
import javax.servlet.http.HttpServlet;
import javax.servlet.http.HttpServletRequest;
import javax.servlet.http.HttpServletResponse;

/**
 * Servlet implementation class AddUser
 */
@WebServlet("/AddUser")
public class AddUser extends HttpServlet {
	private static final long serialVersionUID = 1L;

    /**
     * @see HttpServlet#HttpServlet()
     */
    public AddUser() {
        super();
    }

	/**
	 * @see HttpServlet#doGet(HttpServletRequest request, HttpServletResponse response)
	 */
	protected void doGet(HttpServletRequest request, HttpServletResponse response)
			throws ServletException, IOException {
	}

	/**
	 * @see HttpServlet#doPost(HttpServletRequest request, HttpServletResponse response)
	 */
	protected void doPost(HttpServletRequest request, HttpServletResponse response)
			throws ServletException, IOException {
		request.setCharacterEncoding("UTF-8");
		Connection con = null;
		Statement st = null;
		String userID = request.getParameter("userid");
    	String password = request.getParameter("password");

    	try {
    		Class.forName("org.postgresql.Driver");
    		con = DriverManager.getConnection(
    			"jdbc:postgresql:login","postgres", "root");
    		st = con.createStatement();
    		try {
        		int res = st.executeUpdate("INSERT INTO userinf (userid, password) VALUES ('" + userID +
        				"', '" + password + "')");
    		} catch (Exception ex) {
    			ex.printStackTrace();
    		}
    		st.close();
    		con.close();
    	} catch (ClassNotFoundException e) {
    		e.printStackTrace();
    	} catch (SQLException e) {
    		e.printStackTrace();
    	}
    	response.sendRedirect("admin.jsp");
	}
}
最後はユーザの削除処理を行うDelUser.javaサーブレットです。
package com.example;

import java.io.IOException;
import java.sql.Connection;
import java.sql.DriverManager;
import java.sql.SQLException;
import java.sql.Statement;

import javax.servlet.ServletException;
import javax.servlet.annotation.WebServlet;
import javax.servlet.http.HttpServlet;
import javax.servlet.http.HttpServletRequest;
import javax.servlet.http.HttpServletResponse;

/**
 * Servlet implementation class DelUser
 */
@WebServlet("/DelUser")
public class DelUser extends HttpServlet {
	private static final long serialVersionUID = 1L;

    /**
     * @see HttpServlet#HttpServlet()
     */
    public DelUser() {
        super();
    }

	/**
	 * @see HttpServlet#doGet(HttpServletRequest request, HttpServletResponse response)
	 */
	protected void doGet(HttpServletRequest request, HttpServletResponse response)
			throws ServletException, IOException {
	}

	/**
	 * @see HttpServlet#doPost(HttpServletRequest request, HttpServletResponse response)
	 */
	protected void doPost(HttpServletRequest request, HttpServletResponse response)
			throws ServletException, IOException {
		request.setCharacterEncoding("UTF-8");
		Connection con = null;
		Statement state = null;
		String userID = request.getParameter("userid");

    	try {
    		Class.forName("org.postgresql.Driver");
    		con = DriverManager.getConnection(
    			"jdbc:postgresql:login","postgres", "root");
    		state = con.createStatement();
    		try {
        		int res = state.executeUpdate("DELETE FROM userinf WHERE userid = '" + userID + "'");
    		} catch (Exception ex) {
    			ex.printStackTrace();
    		}
    		state.close();
    		con.close();
    	} catch (ClassNotFoundException e) {
    		e.printStackTrace();
    	}catch (SQLException e) {
    		e.printStackTrace();
    	}
    	response.sendRedirect("admin.jsp");
	}
}
以上がユーザ管理処理のソースコードです。
今回はデータベースをJSPやサーブレットでどのように使うかに焦点を当て開発しました。
このため各処理の内容はほとんどデータベースに対するアクセス処理が占めており、各処理で処理結果に応じたメッセージを返すなど、独自ロジックを組み込もうとすると容易ではありません。
しかし、実際の開発では各処理ごとに処理結果に応じた独自処理は必須であり、独自ロジック(ビジネスロジック)が組み込みやすいよう、各処理でデータベースへのアクセス処理を隠蔽し、コードの見通しを良くする必要があります。
そこで、次のログイン処理(Daoを使った改良版)ではプログラムの保守性、拡張性を向上する改良を行います。